Gimp


Please feel free to contact us
Go
Please feel free to contact us
Go
GIMP (GNU Image Manipulation Program) refers to an open-source raster graphics editor that is used for image manipulation (retouching) and image editing, free-form drawing, transcoding between different image file formats, and more specialized tasks.
GIMP is modular, extensible, and expandable and is designed to be with plug-ins and extensions to do just about anything. The advanced scripting interface enables everything from the very simple task to the most complex image-manipulation procedures to be effectively scripted.
High-quality Photo Manipulation: GIMP offers the required tools to give high-quality image manipulation. It gives a wide variety of options from retouching to creative composites and so on
Original Artwork Creation: GIMP provides artists the power and flexibility to transmute images into truly unique creations.
Graphic Design Elements: GIMP is used to produce icons, graphical design elements, and art for user interface components and mockups.
Programming Algorithms: GIMP is a high-quality framework for scripted image manipulation that supports multi-language such as Perl, C, C++, Python, Scheme, and so on.
You can subscribe to Gimp, an AWS Marketplace product and launch an instance from the product’s AMI using the Amazon EC2 launch wizard.
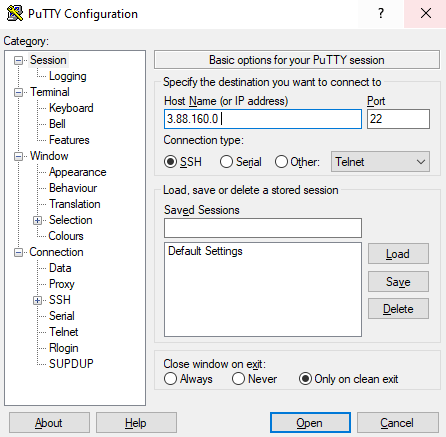
Step 1: Open putty and connect with your machine.
Step 2: Login with user name “ubuntu”
Step 3: Sudo su
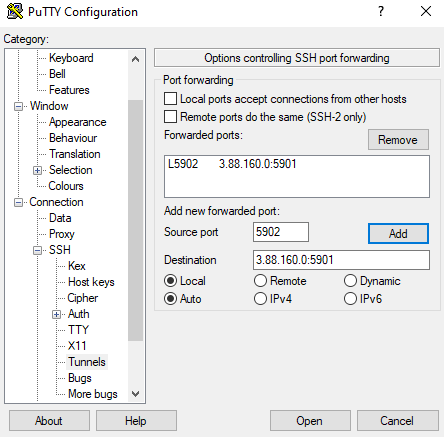
Step 4: Remember to add an port 5901 in your AWS Instance Security Group in order for tunneling to work.
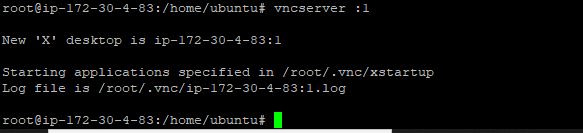
Step 5: vncserver :1
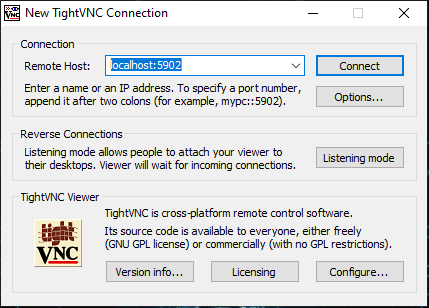
Step 6: Open new putty and enter the following details.
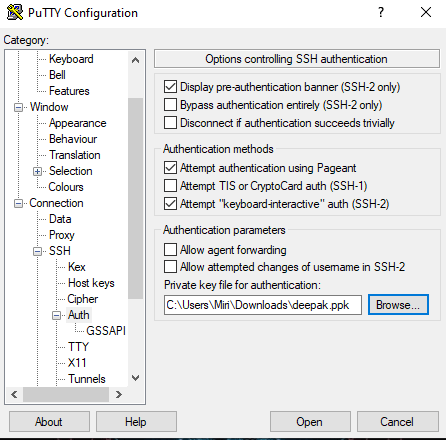
Step 7: After that click on open and login as a “Ubuntu”.
If you’re on Windows, download Tight-VNC to install VNC. Connect to localhost::5902 and use the password you gave above. You should now see your new shiny Ubuntu desktop.
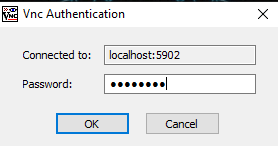
Password :- miri@123
Use the password you provided during the installation of VNC server
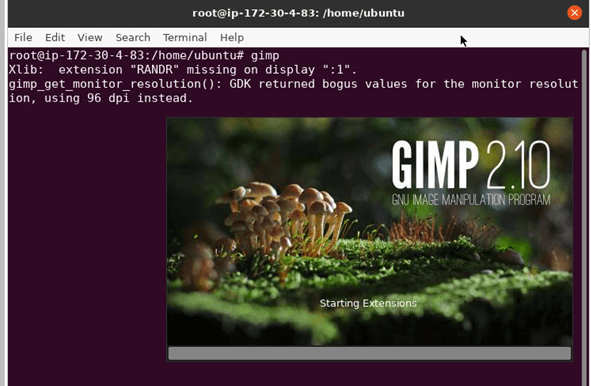
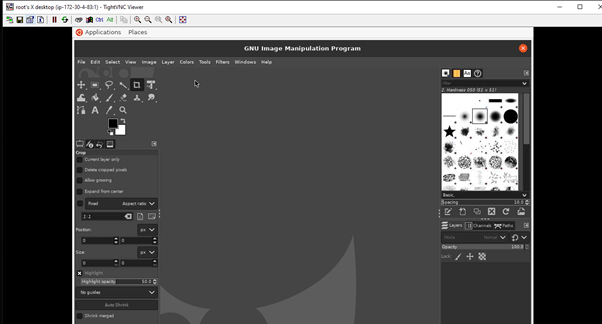
Enjoy using Gimp…
All your queries are important to us. Please feel free to connect.
24X7 support provided for all the customers.
We are happy to help you.
Submit your Query: https://miritech.com/contact-us/
Contact Numbers:
Contact E-mail:
Amazon EC2 allows you to set up and configure everything about your instances from your operating system up to your applications. An Amazon Machine Image (AMI) is simply a packaged-up environment that includes all the necessary bits to set up and boot your instance. Your AMIs are your unit of deployment. You might have just one AMI or you might compose your system out of several building block AMIs (e.g., webservers, appservers, and databases). Amazon EC2 provides a number of tools to make creating an AMI easy. Once you create a custom AMI, you will need to bundle it. If you are bundling an image with a root device backed by Amazon EBS, you can simply use the bundle command in the AWS Management Console. If you are bundling an image with a boot partition on the instance store, then you will need to use the AMI Tools to upload it to Amazon S3. Amazon EC2 uses Amazon EBS and Amazon S3 to provide reliable, scalable storage of your AMIs so that we can boot them when you ask us to do so.
Or, if you want, you don’t have to set up your own AMI from scratch. You can choose from a number of globally available AMIs that provide useful instances. For example, if you just want a simple Linux server, you can choose one of the standard Linux distribution AMIs.
Traditional hosting services generally provide a pre-configured resource for a fixed amount of time and at a predetermined cost. Amazon EC2 differs fundamentally in the flexibility, control and significant cost savings it offers developers, allowing them to treat Amazon EC2 as their own personal data center with the benefit of Amazon.com’s robust infrastructure.
When computing requirements unexpectedly change (up or down), Amazon EC2 can instantly respond, meaning that developers have the ability to control how many resources are in use at any given point in time. In contrast, traditional hosting services generally provide a fixed number of resources for a fixed amount of time, meaning that users have a limited ability to easily respond when their usage is rapidly changing, unpredictable, or is known to experience large peaks at various intervals.
Secondly, many hosting services don’t provide full control over the compute resources being provided. Using Amazon EC2, developers can choose not only to initiate or shut down instances at any time, they can completely customize the configuration of their instances to suit their needs – and change it at any time. Most hosting services cater more towards groups of users with similar system requirements, and so offer limited ability to change these.
Finally, with Amazon EC2 developers enjoy the benefit of paying only for their actual resource consumption – and at very low rates. Most hosting services require users to pay a fixed, up-front fee irrespective of their actual computing power used, and so users risk overbuying resources to compensate for the inability to quickly scale up resources within a short time frame.
No. You do not need an Elastic IP address for all your instances. By default, every instance comes with a private IP address and an internet routable public IP address. The private address is associated exclusively with the instance and is only returned to Amazon EC2 when the instance is stopped or terminated. The public address is associated exclusively with the instance until it is stopped, terminated or replaced with an Elastic IP address. These IP addresses should be adequate for many applications where you do not need a long lived internet routable end point. Compute clusters, web crawling, and backend services are all examples of applications that typically do not require Elastic IP addresses.
You have complete control over the visibility of your systems. The Amazon EC2 security systems allow you to place your running instances into arbitrary groups of your choice. Using the web services interface, you can then specify which groups may communicate with which other groups, and also which IP subnets on the Internet may talk to which groups. This allows you to control access to your instances in our highly dynamic environment. Of course, you should also secure your instance as you would any other server.
GIMP is a powerful open-source graphic editor.
GIMP offers extensibility through integration with various programming languages entailing Scheme, Perl, Python, and so on.
GIMP offers amazing color management features to ensure high fidelity color reproduction across printed and digital media.
Gimp