Postfix-mail-server

Please feel free to contact us

Go
img

About

Postfix is a hugely-popular Mail Transfer Agent (MTA) designed to determine routes and send emails. This cross-platform server is open-source, free, and suitable for installation on the majority of UNIX-like operating systems.

Numerous client and server programs make up Postfix: the latter tend to run in the backend, while user or administrator programs utilize the former. Postfix’s structure is modular: it comprises various small, independent executables. Different parameters, features, and options are available, too.

Another key aspect of Postfix is that it was created to overcome those drawbacks seen in Sendmail. A solid configuration keeps Postfix user data secure from leakage, abuse, and spam.

Postfix includes a cutting-edge queue manager capable of handling queues in a faster, smoother way. That’s why a number of administrators cite Postfix’s higher efficiency compared to Sendmail, even with high loads.

Here are the main advantages you can expect to find when you start using Postfix:

  • Includes highly-detailed documentation
  • Security was clearly a priority in Postfix’s design
  • Postfix offers impressive compatibility with Sendmail
  • High queuing operation is fundamental to Postfix’s functionality
  • Active development is part of the Postfix set-up
  • Easy configuration, according to parameters of configuration files

You can subscribe to Mautic, an AWS Marketplace product and launch an instance from the product’s AMI using the Amazon EC2 launch wizard.

To launch an instance from the AWS Marketplace using the launch wizard

  • Open the Amazon EC2 console at https://console.aws.amazon.com/ec2/
  • From the Amazon EC2 dashboard, choose Launch Instance. On the Choose an Amazon Machine Image (AMI) page, choose the AWS Marketplace category on the left. Find a suitable AMI by browsing the categories, or using the search functionality. Choose Select to choose your product.
  • A dialog displays an overview of the product you’ve selected. You can view the pricing information, as well as any other information that the vendor has provided. When you’re ready, choose Continue.
  • On the Choose an Instance Type page, select the hardware configuration and size of the instance to launch. When you’re done, choose Next: Configure Instance Details.
  • On the next pages of the wizard, you can configure your instance, add storage, and add tags. For more information about the different options you can configure, see Launching an Instance. Choose Next until you reach the Configure Security Group page.
  • The wizard creates a new security group according to the vendor’s specifications for the product. The security group may include rules that allow all IP addresses (0.0.0.0/0) access on SSH (port 22) on Linux or RDP (port 3389) on Windows. We recommend that you adjust these rules to allow only a specific address or range of addresses to access your instance over those ports
  • When you are ready, choose Review and Launch.
  • On the Review Instance Launch page, check the details of the AMI from which you’re about to launch the instance, as well as the other configuration details you set up in the wizard. When you’re ready, choose Launch to select or create a key pair, and launch your instance.
  • Depending on the product you’ve subscribed to, the instance may take a few minutes or more to launch. You are first subscribed to the product before your instance can launch. If there are any problems with your credit card details, you will be asked to update your account details. When the launch confirmation page displays.

Usage/Deployment Instructions

Step 1: SSH into your instance with username ubuntu and key pair to start the application

Username: ubuntu

ssh -i ssh_key.pem ubuntu@instance-IP

Ssh into vm:

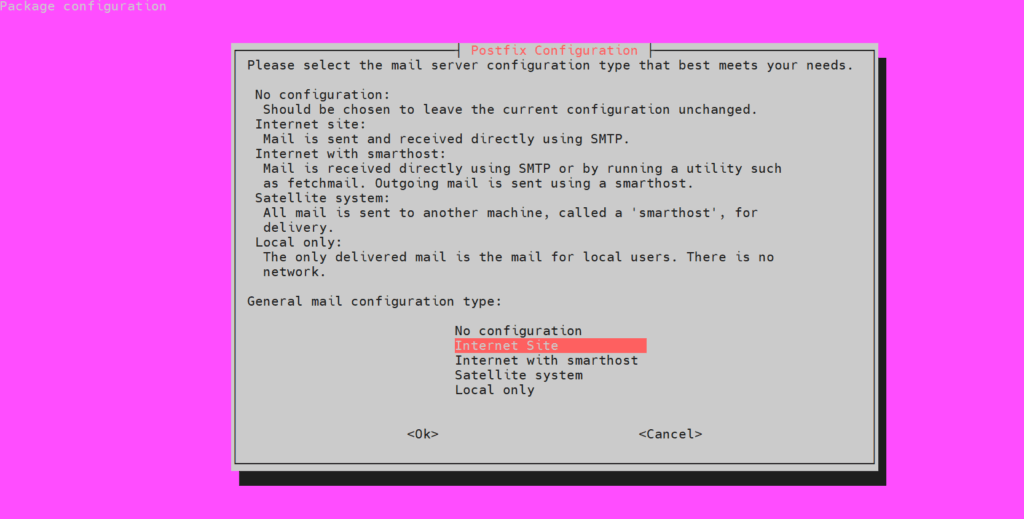
Reconfigure Postfix:

$   sudo dpkg-reconfigure postfix

  1. In the configuration wizard:
    • Select Internet Site (for most common setups)
    • Enter your system’s mail name (e.g., your domain name like example.com)
    • For other options, you can typically accept defaults unless you have specific needs

After reconfiguration, restart Postfix:

sudo systemctl restart postfix

Check the status:

sudo systemctl status postfix

All your queries are important to us. Please feel free to connect.

24X7 support provided for all the customers.

We are happy to help you.

Submit your Queryhttps://miritech.com/contact-us/

Contact Numbers:

Contact E-mail:

Submit Your Request


    Input this code: captcha

    Highlights

    • icon

      Includes highly-detailed documentation

    • icon

      Security was clearly a priority in Postfix’s design

    • icon

      Easy configuration, according to parameters of configuration files

    • icon

      High queuing operation is fundamental to Postfix’s functionality

    Application Installed

    • icon Linux