Rancher


Please feel free to contact us
Go
Rancher is a container management platform that helps manage Kubernetes at scale. It makes it simple to deploy and run Kubernetes everywhere. The software is especially useful as most cloud virtualization vendors include Kubernetes as standard infrastructure.
Rancher is a framework for managing containers that aid in scaling Kubernetes administration. This software is particularly helpful because Kubernetes is typically included in standard infrastructure by cloud/virtualization suppliers.
Rancher is an open-source Kubernetes management platform designed to help organizations deploy, manage, and scale containerized applications across multiple clusters and environments. Rancher is particularly valuable for multi-cluster environments and offers extensive support for cloud-native, on-premises, and hybrid deployments.
You can subscribe to Rancher, an AWS Marketplace product and launch an instance from the product’s AMI using the Amazon EC2 launch wizard.
Step 1: SSH into Your Instance: Use the SSH command with the username ubuntu and the appropriate key pair to start the application.
Username: ubuntu
ssh -i path/to/ssh_key.pem ubuntu@instance-IP
Replace path/to/ssh_key.pem with the path to your SSH key file and instance-IP with your instance’s public IP address.
Step 2: Now, open your web browser and access the Rancher web interface using the URL
http://instance-ip:8080. You should see the following page:

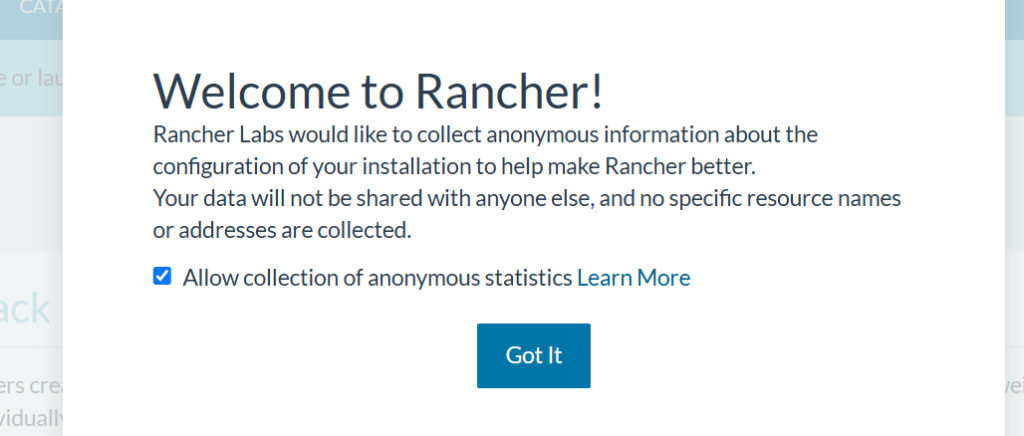
Step 2: Click Got it.
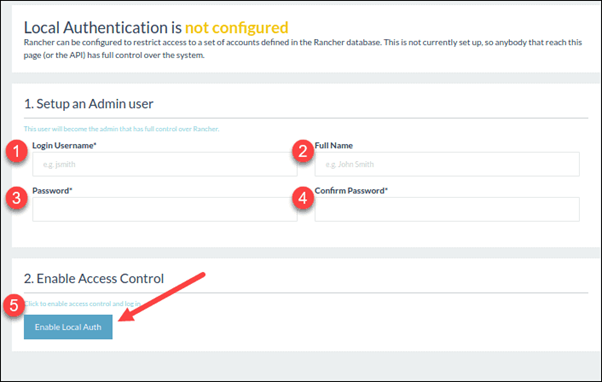
Step 3: Once you have accessed the platform, Rancher instructs you to set up the Admin user (one that has full control over Rancher).
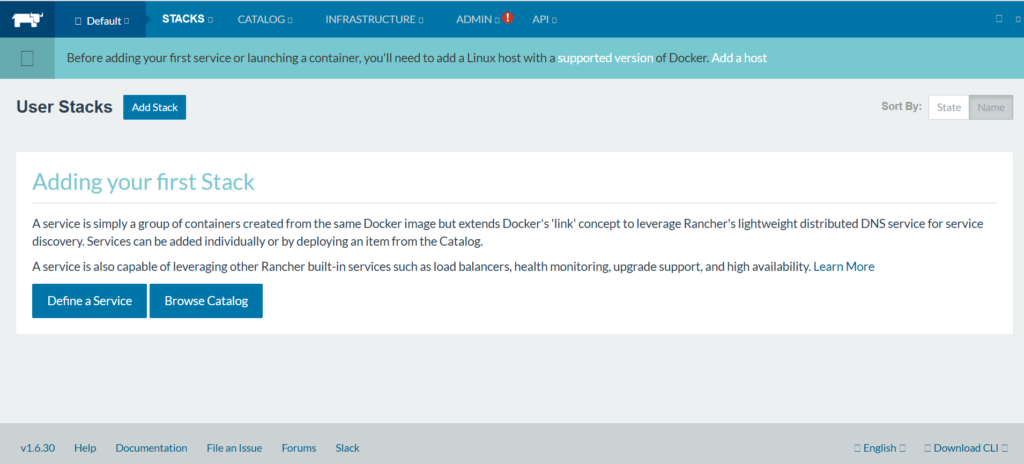
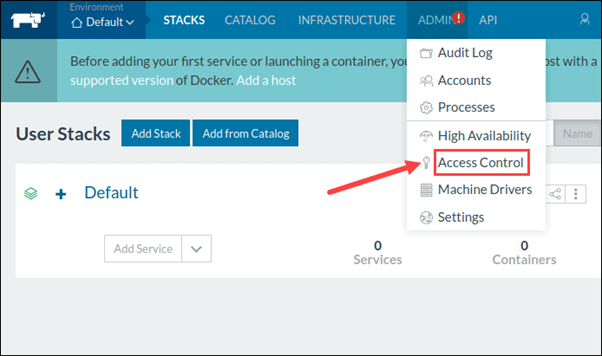
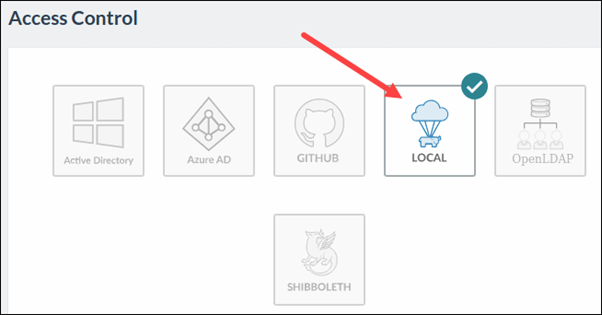
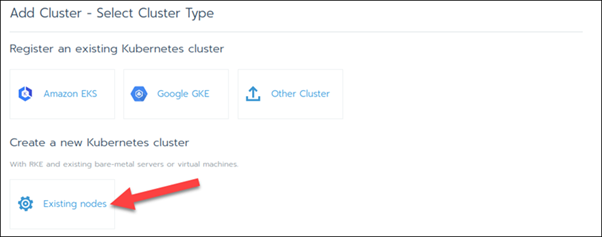
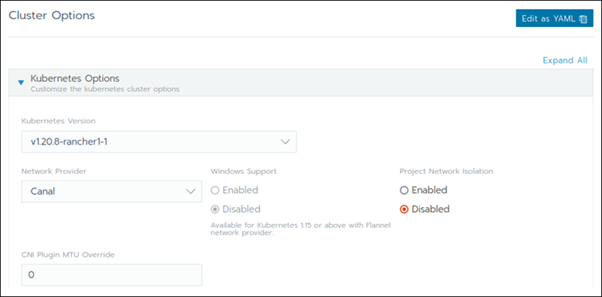
Step 4: Create a Custom Cluster
When creating a custom Kubernetes cluster on Rancher, you need to provision a Linux host (an on-premise virtual machine, a cloud-host VM or a bare metal server). Then, you can create your custom Kubernetes cluster.
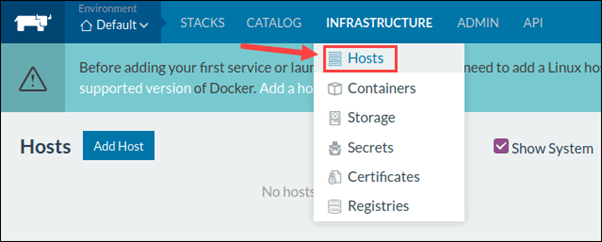


With the Linux host assigned, move on to creating a custom cluster.





All your queries are important to us. Please feel free to connect.
24X7 support provided for all the customers.
We are happy to help you.
Submit your Query: https://miritech.com/contact-us/
Contact Numbers:
Contact E-mail:
Amazon EC2 allows you to set up and configure everything about your instances from your operating system up to your applications. An Amazon Machine Image (AMI) is simply a packaged-up environment that includes all the necessary bits to set up and boot your instance. Your AMIs are your unit of deployment. You might have just one AMI or you might compose your system out of several building block AMIs (e.g., webservers, appservers, and databases). Amazon EC2 provides a number of tools to make creating an AMI easy. Once you create a custom AMI, you will need to bundle it. If you are bundling an image with a root device backed by Amazon EBS, you can simply use the bundle command in the AWS Management Console. If you are bundling an image with a boot partition on the instance store, then you will need to use the AMI Tools to upload it to Amazon S3. Amazon EC2 uses Amazon EBS and Amazon S3 to provide reliable, scalable storage of your AMIs so that we can boot them when you ask us to do so.
Or, if you want, you don’t have to set up your own AMI from scratch. You can choose from a number of globally available AMIs that provide useful instances. For example, if you just want a simple Linux server, you can choose one of the standard Linux distribution AMIs.
VPC endpoints enable you to privately connect your VPC to services hosted on AWS without requiring an Internet gateway, a NAT device, VPN, or firewall proxies. Endpoints are horizontally scalable and highly available virtual devices that allow communication between instances in your VPC and AWS services. Amazon VPC offers two different types of endpoints: gateway type endpoints and interface type endpoints.
Gateway type endpoints are available only for AWS services including S3 and DynamoDB. These endpoints will add an entry to your route table you selected and route the traffic to the supported services through Amazon’s private network.
Interface type endpoints provide private connectivity to services powered by PrivateLink, being AWS services, your own services or SaaS solutions, and supports connectivity over Direct Connect. More AWS and SaaS solutions will be supported by these endpoints in the future. Please refer to VPC Pricing for the price of interface type endpoints.
Amazon S3 is a simple key-based object store. When you store data, you assign a unique object key that can later be used to retrieve the data. Keys can be any string, and they can be constructed to mimic hierarchical attributes. Alternatively, you can use S3 Object Tagging to organize your data across all of your S3 buckets and/or prefixes.
By default, Amazon RDS chooses the optimal configuration parameters for your DB Instance taking into account the instance class and storage capacity. However, if you want to change them, you can do so using the AWS Management Console, the Amazon RDS APIs, or the AWS Command Line Interface. Please note that changing configuration parameters from recommended values can have unintended effects, ranging from degraded performance to system crashes, and should only be attempted by advanced users who wish to assume these risks.
Amazon S3 is secure by default. Upon creation, only the resource owners have access to Amazon S3 resources they create. Amazon S3 supports user authentication to control access to data. You can use access control mechanisms such as bucket policies and Access Control Lists (ACLs) to selectively grant permissions to users and groups of users. The Amazon S3 console highlights your publicly accessible buckets, indicates the source of public accessibility, and also warns you if changes to your bucket policies or bucket ACLs would make your bucket publicly accessible.
You can securely upload/download your data to Amazon S3 via SSL endpoints using the HTTPS protocol. If you need extra security you can use the Server-Side Encryption (SSE) option to encrypt data stored at rest. You can configure your Amazon S3 buckets to automatically encrypt objects before storing them if the incoming storage requests do not have any encryption information. Alternatively, you can use your own encryption libraries to encrypt data before storing it in Amazon S3.
DB instances are simple to create, using either the AWS Management Console, Amazon RDS APIs, or AWS Command Line Interface. To launch a DB instance using the AWS Management Console, click “RDS,” then the Launch DB Instance button on the Instances tab. From there, you can specify the parameters for your DB instance including DB engine and version, license model, instance type, storage type and amount, and master user credentials.
You also have the ability to change your DB instance’s backup retention policy, preferred backup window, and scheduled maintenance window. Alternatively, you can create your DB instance using the CreateDBInstance API or create-db-instance command.
Rancher uses a fleet model, allowing you to deploy applications to multiple clusters simultaneously, supporting large-scale, distributed architectures.
Within clusters, Rancher enables fine-grained organization of resources using projects groups of namespaces and policies, helping teams organize workloads efficiently.
Rancher supports centralized identity management systems like LDAP, Active Directory, GitHub, and SAML for user authentication and authorization.
 apache2